
Transcript: Hybrid Cloud Platform and ‘as a Service’ Options


Hybrid Cloud Platform and as a Service Options
Hi, I’m Mike Morris. I’m the Senior Director of Platform Cloud and Infrastructure Services at NetApp IT. Today, I’m going to talk about our hybrid cloud platform that we use to build as-a-service options. We call this hybrid cloud CloudOne inside of NetApp.
Role as Customer-1
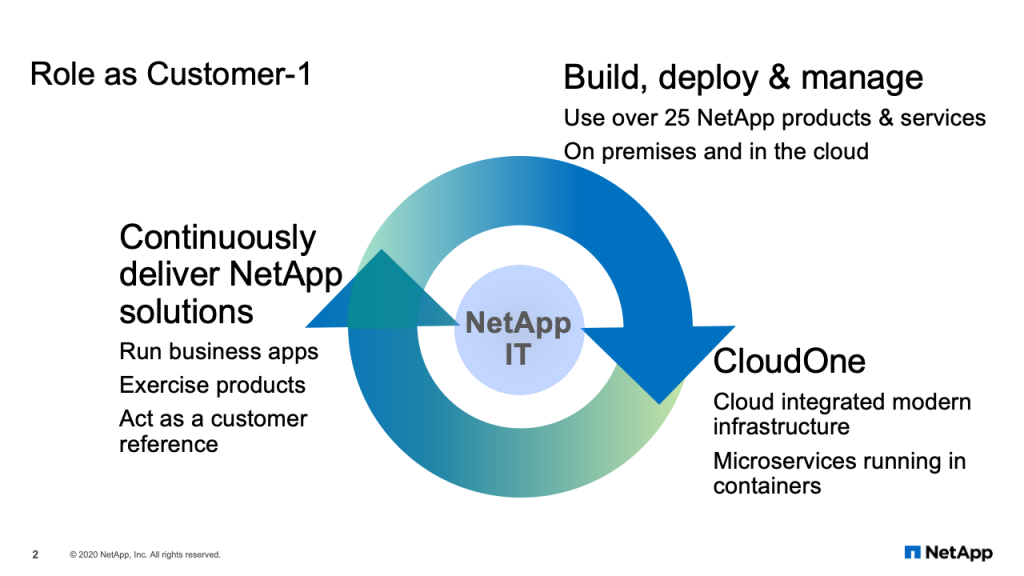
What I’d first like to talk about, though, is our role as Customer-1. And this is an important role that my organization plays inside of NetApp IT. Our role of Customer-1 starts with how we build, deploy and manage NetApp products in our own environment. We use over 25 NetApp products and services on-premises in our data centers and in the cloud environments we manage, also. A lot of that work, and a lot of that product adoption, is in the service of CloudOne, as I mentioned, which is our hybrid cloud platform to offer as-a-service options to internal application teams. We have an integrated cloud modern infrastructure, and many of our services in CloudOne use microservices running in containers.
This work continues as we deliver solutions using NetApp products. We run business applications on NetApp products, and we’d like to say we exercise those products in production. We do not test, and we do not QA the products. We are enterprise IT. We run them in production using our most critical applications. And then we act as a customer reference through our NetApp on NetApp program to share our stories with customers.
NetApp IT Hybrid Cloud Evolution
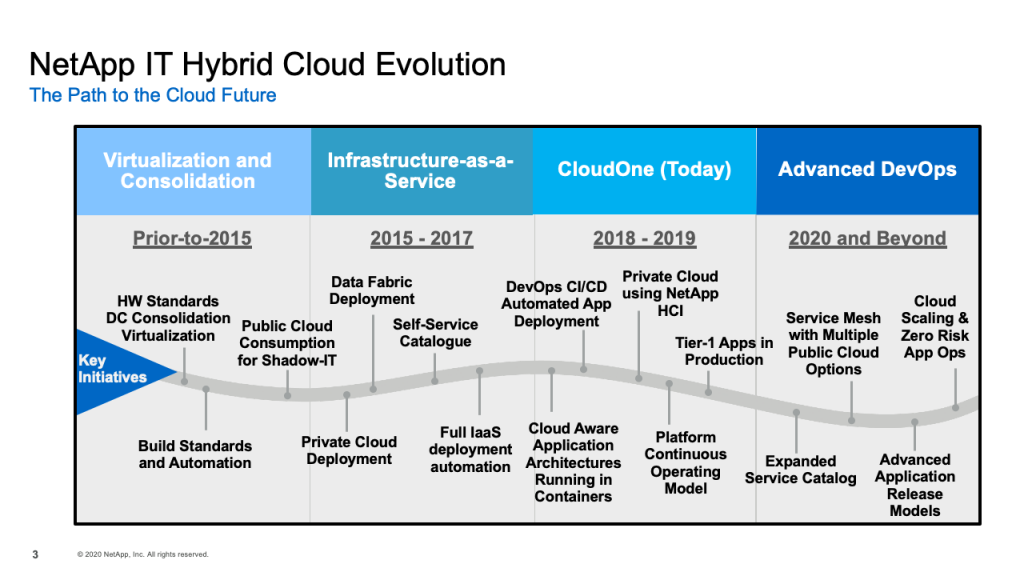
We’ve been on this hybrid cloud evolution for several years now. It began prior to 2015 when, as many organizations did, we standardized our hardware and started moving down the path of virtualization and some initial automation to do builds for virtual machines and storage. That led to our first public cloud or our first hybrid cloud, which is an infrastructure as a service offering in 2015 that we called nCloud. It used both public and private cloud, had a self-service catalog and provided the ability to do a full infrastructure as a service landscape deployment using automation in 15 minutes. We learned a lot from that hybrid cloud, but we wanted to improve its abilities, improve the capabilities in the future. That then led to CloudOne, where we are today. CloudOne provides many services, which I’ll talk about coming up, and particularly it was originally built for the DevOps service, which provides full CI/CD pipelines for automated app deployments.
We build cloud aware applications using cloud aware application architectures that fit nicely in containers. We have a private cloud built on NetApp HCI, and we have a continuous operating model to improve and deliver new features in the platform. About a year ago, we improved the platform from an operations, stability and monitoring perspective so that we now run tier one applications on CloudOne, which are our most important applications. And we continue to improve CloudOne in our DevOps environment into the future. We’ve expanded our service catalog, which I’ll talk a little bit about today. We are looking at service mesh technology so we can use multiple public cloud options and we’ve developed advanced application release models, so we can deploy changes to production applications in a safe, metered way using canary releases. What we’re ultimately trying to achieve in the future, though, is cloud scaling and zero risk application operations, so we can really move and scale our applications across multiple cloud environments and do it in a zero-risk way.
Cloud First Strategy
Now it’s important to understand our cloud first strategy in NetApp IT, and it really breaks into two major areas. First are the run the business applications. These are the applications which are not necessarily differentiating or provide competitive advantage to your company, but are still critical for the fundamental operations of the company. Things like ERP platforms, HR environments, financial applications, and collaboration applications. These are all common type of business applications that every organization needs. So instead of trying to build those applications ourselves, we would much prefer to go rent them from SaaS providers. SaaS providers have already taken the time to automate these common business practices, so it’s much more efficient for us to rent those services from the SaaS providers, whether it’s Office 365, ServiceNow or Adobe.
The other major category from our cloud first strategy are the applications which transform the business. These are the applications that give us competitive advantage, allow us to focus on our customers and are unique enough to NetApp that we probably can’t rent it from a SaaS provider. In this situation, we want to do rapid software development using dynamic cloud services. This is our DevOps environments. And when we do rapid software development, we’re going to use clouds like AWS, Azure and our private cloud.
CloudOne Platform
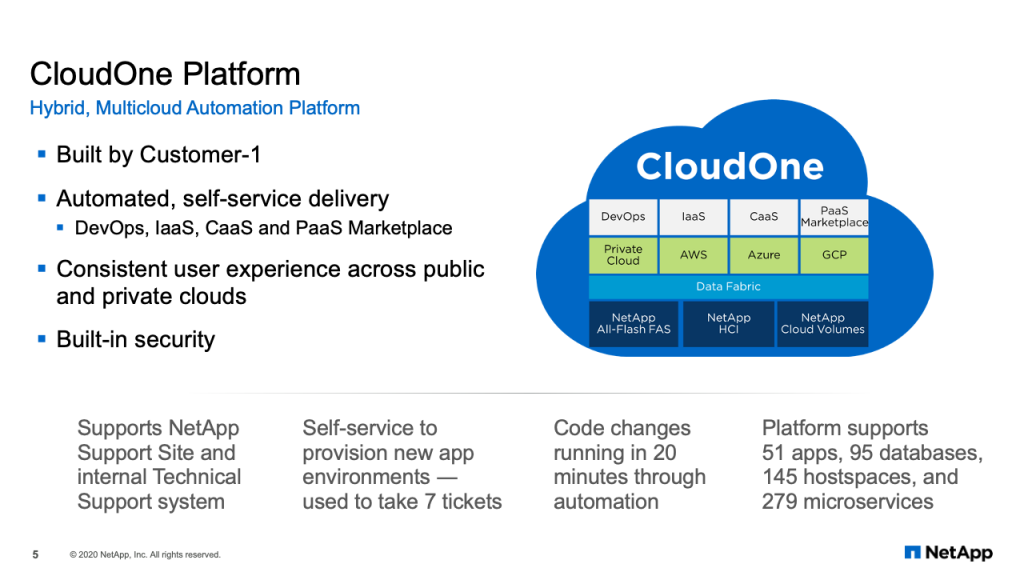
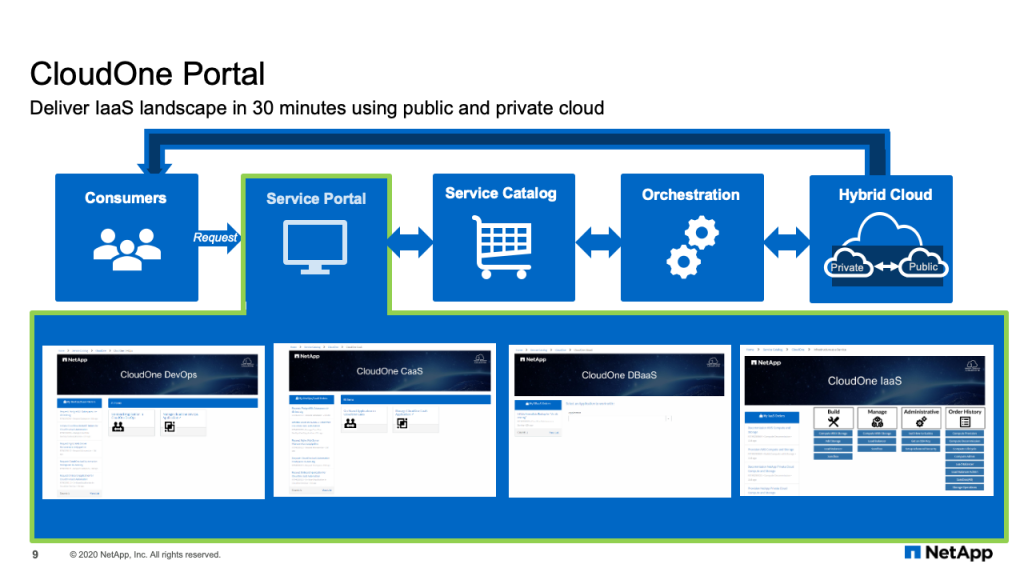
And that leads to CloudOne. As I mentioned, CloudOne is our hybrid multi-cloud automated platform for custom application development. So you think in the previous slide, we had the SaaS environments for the traditional applications. And then we had the transform the business applications, the custom applications. Those applications are built and run on CloudOne. And we provide four services for application teams in CloudOne. First, the DevOps service. That’s the original service, where we provide the complete portfolio of capabilities and services that application teams need to build and run applications on CloudOne. We also offer infrastructure as a service, which can deploy infrastructure landscapes in five to 15 minutes. And we have container as a service, which runs prebuilt containers in a microservices containerized environment. And we’re building right now the PaaS marketplace, which will expose hyperscaler capabilities through our same governance and self-service catalog in CloudOne. The key point here in building CloudOne was a consistent user experience across public and private clouds with built in security. Now our application teams have one self-service catalog to go to to select the different services they need, that are then automated across our different cloud environments and our NetApp products. One example of an application that runs today on CloudOne is the NetApp Support Site. And that is an internal technical support applications, which provides case automation. The self-service catalogs in CloudOne allow us to provision new application environments in about 30 minutes. What used to take seven tickets and multiple days now is done with one automation workflow in about 30 minutes. Once applications are onboarded onto the platform, the CI/CD automation can move changes in 20 minutes to production. Today CloudOne supports 51 applications, 95 databases and almost 280 different microservices that represent different applications.
CloudOne Platform
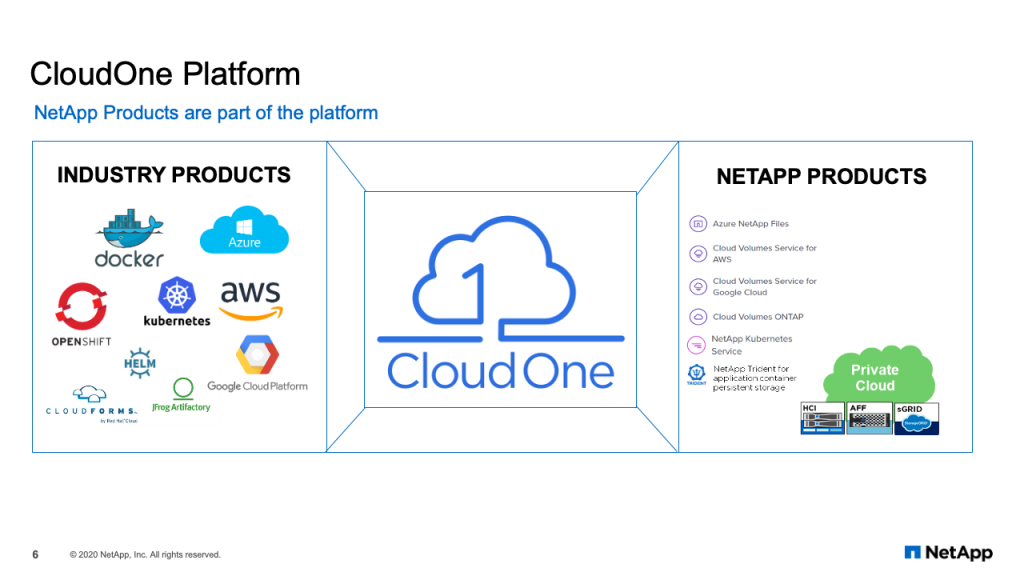
If we look inside the CloudOne platform, CloudOne is really a combination and integration of multiple industry products and NetApp products. Our job in my organization is to select the right products and technologies, both in the public cloud and on-premises, along with NetApp products and capabilities and integrate them together to create services that our application teams need. Those services being, as I showed on the previous slide, the DevOps service, the infrastructure as a service and container as a service.
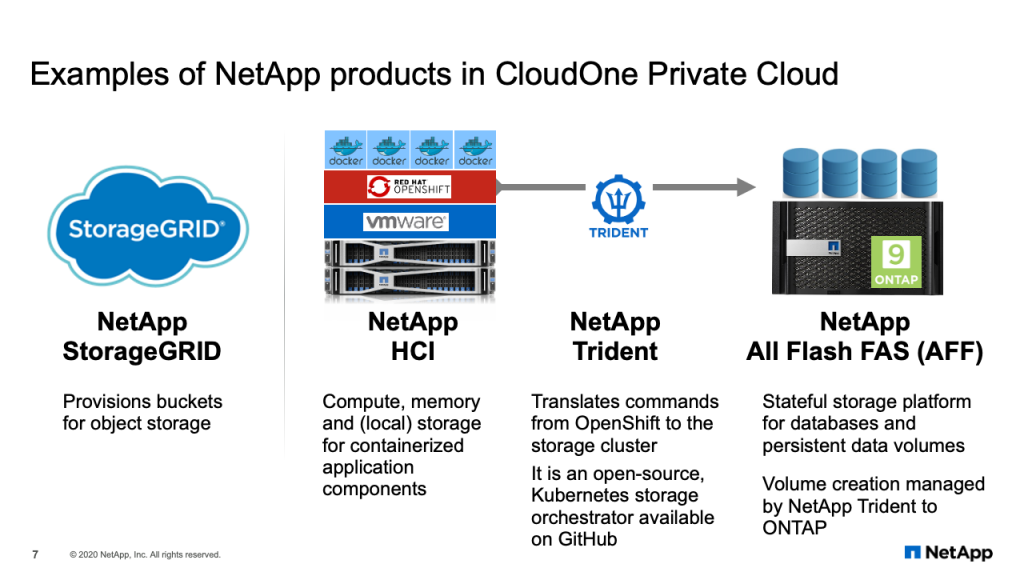
Examples of NetApp products in CloudOne Private Cloud
Some examples of NetApp products using CloudOne are our private cloud. Our private cloud that supports CloudOne is heavily built on NetApp products. First, we have NetApp StorageGRID to provision object storage for the applications. So if applications need object storage, we have that as part of the self-service automated catalog. Next, the compute environment for the containerized applications runs on NetApp HCI. We’ve then integrated NetApp Trident, which is a plugin for Kubernetes environments, to do storage provisioning for containerized applications onto NetApp All Flash FAS.
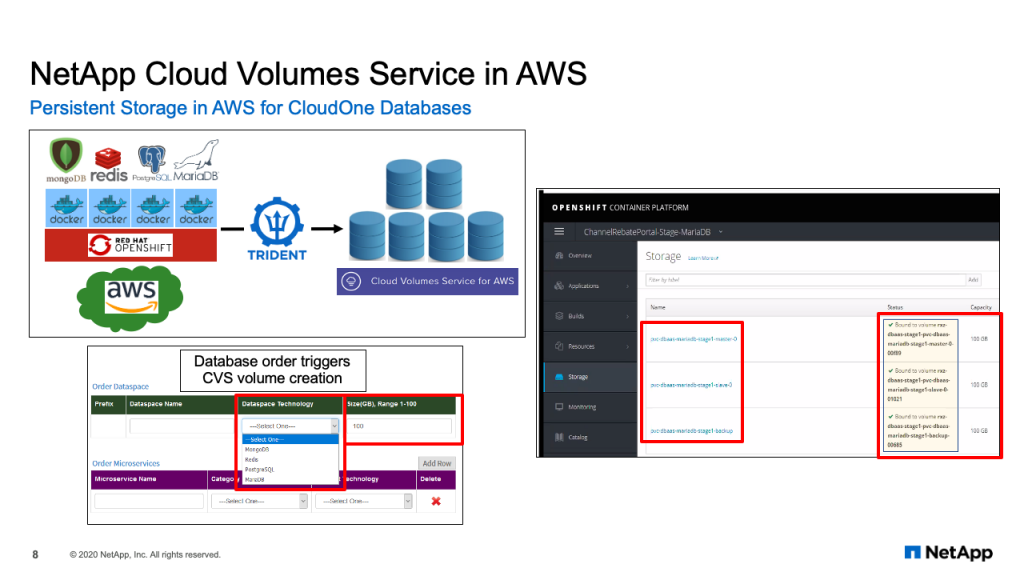
NetApp Cloud Volumes Service in AWS
We also use NetApp products in the public cloud. In this situation, we have persistent storage in AWS for CloudOne databases. So just like in the private cloud, in the public cloud we run OpenShift clusters for microservices based applications running in Docker containers. Some of those applications are databases, for example, Mongo, Redis, Postgres and Maria. Anytime a database is spun up in a container, it does what’s called a persistent volume claim for storage. That persistent volume claim is captured by NetApp Trident and then provisioned on NetApp Cloud Volume Services for AWS. On the bottom left of the diagram, you can see the self-service catalog where the application team would select the database they want and the size of the database they need. On the right hand side shows a screenshot of our OpenShift platform with a Maria database that has been bound to a cloud volume.
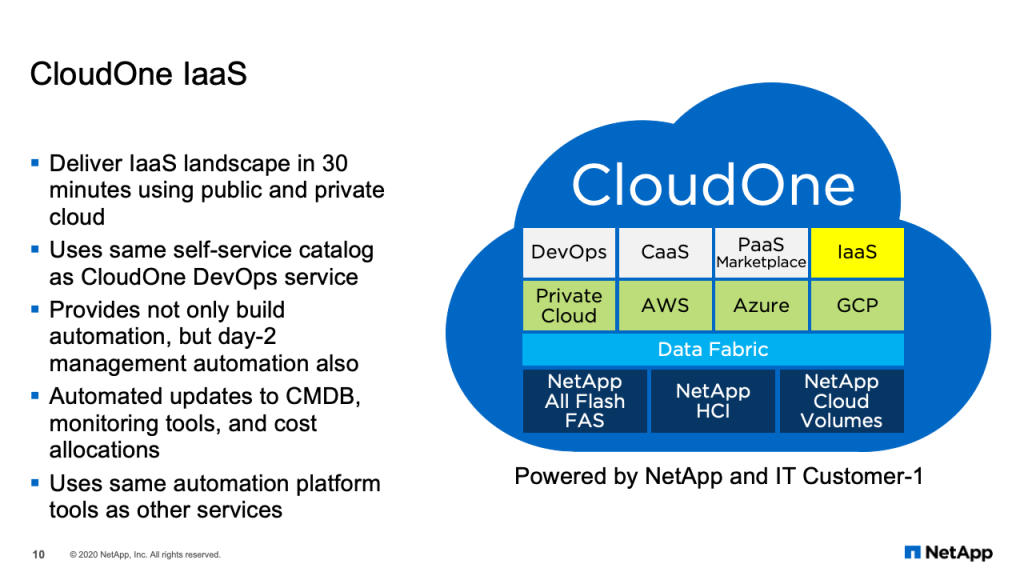
CloudOne IaaS
Now in particular, one of the services we offer is CloudOne infrastructure as a service. CloudOne infrastructure as a service delivers infrastructure landscape in 30 minutes using public or private cloud. It uses the same self-service catalog as CloudOne DevOps. And it provides not only build automation, but also day-2 management automation. And that’s important, because while it may take only 30 minutes to create an infrastructure landscape, it usually goes for months or years that you have to maintain that environment. So day-2 automation is particularly important.
Part of the automation includes updates to our CMDB, our monitoring tools and our cost allocations. So when we onboard new infrastructure landscapes, it’s important that those infrastructure landscapes are tracked and can be supported by operations. And we use the same automation platform tools as other services. So the automation and tools that make up the DevOps service, the CaaS service, also support infrastructure as a service. It’s a very efficient way to use a common platform, CloudOne, to offer different services to our application teams. Thank you for your time today. And I’ll be passing now to Matt Norton who will deep dive into our infrastructure’s service offering.
Infrastructure as a Service in NetApp IT
Hi, my name is Matt Norton and I am a senior engineer on the NetApp IT Cloud & Compute Services team. First, I will walk you through infrastructure as a service, including a look at our ServiceNow UI portal, as well as a high level architecture.
CloudOne Portal Demo
The CloudOne portal UI is based on ServiceNow. So what you’re looking at now is our instance of ServiceNow, and this is the main landing page for Cloud One. You see the top three components. We have DevOps container as a service and database as a service. All of those are container based, currently. At the bottom, you have infrastructure as a service or IaaS for short, which is strictly VM-based.
So why ServiceNow? ServiceNow provides a lot of data and intelligence about our company. Some of those are user detail around management structure, cost center information. ServiceNow provides an existing easy way to use SSO so that you just can use existing username and password to access the CloudOne portal. Everything that you can do in the portal, for example, provisioning a VM, creates a ServiceNow RITM. So the RITM leaves a nice paper trail. It allows us to do things like workflow approvals. As an example, if someone tries to provision a VM to Amazon, which incurs a very real cost to the company, there is an approval that must be received by the user’s direct line manager. Once that approval is met, then the VM workflow actually kicks off and provisions the VM.
Another example is a lot of the forms for things like submitting a load balance or a VM, as the user fills out the form, the dropdowns, logic is applied to present choices that make sense or enforce our own IT standards on what is being provisioned. As an example, when you provision a particular type of load balance, or let’s say a web load balancer, when you select to deploy web, then different fields are presented after you make the selection. The form is essentially live and updates and enforces our logic and standards based on the user selection, and ServiceNow does a really good job of that.
So I will go ahead and click on the infrastructure as a service link. This is the main IaaS landing page. We can currently provision our VMs to Amazon and on-prem are the environments currently supported. We can provision storage. We can provision storage as part of VM provision, or we can provision it completely independently. We can provision a logical load balancer. Our on-prem solution for load balancers is a F5. In the case of Amazon, it will be an ELB, either an AOB or an NLB, depending on the selections that the user makes. And we also have the sandbox option, which is a time-limited VM, two months is what we currently have, so that users can get in and do easy proof of concept without any preexisting requirements. So typically when a user comes in to provision a VM, they will have to select a ServiceNow application as part of that provision. In the case of sandbox, that requirement is not there, and so there’s really nothing stopping a user from getting in, getting a VM very quickly and testing out what they need to test.
All of the provision options, VM load balancer, et cetera, that I mentioned are captured here under Build. Under Manage, we have day-2 operations, so I’ve already provisioned something, VM load balancer, now I want to go back in and update it. I want to maybe resize it or power on power off, et cetera. Those types of day-2 operations are captured here under manage.
Under Administrative, we have links to helpful ServiceNow KB articles that relate to CloudOne or CloudOne IaaS. Certain things are very common among users, like, “How do I get an SSH key?” which is required as part of the VM provision form. Those things are captured here under Administrative. And then Order History. So this is actually very helpful for the paper trail that I mentioned earlier, where maybe you’re on a team of several people working on a given application and you want to see what other team members have done. Maybe they’ve provisioned other VMs for that application or load balancers, et cetera. You can easily come in here to the Order History and click on the appropriate button to see if any of those actions or workflows have occurred.
Let’s go ahead and take an example of a VM provision, just to show you what the form looks like and how things change as you make selections. So I’ll click under Build, Compute with Storage. The form for this particular action will be loaded. The very first question that we’ll ask someone, regardless of what they’re provisioning within IaaS, is what application is this for? So again, these are applications, application CIs, that already exist in our ServiceNow CMDB. You can select register a new application also, but this will redirect you to a form that is also hosted in ServiceNow that would be filled out and submitted for approval. That process is manual, it goes to an actual human. That person has to review the application and subsequently approve it. So that’s a hurdle.
The sandbox feature I mentioned earlier negates this necessity. So you can get in without an application and easily provision a VM, with some restrictions. But typically you would already have your VM or your application CI registered. You would come in, select Existing. And then from the dropdown, you’ll pick your application, whatever it may be. You also notice that ServiceNow picks up my name here as the requester or owner of the item to be provisioned. My default cost center is also loaded.
Network Accessibility, so this has to do with the network posture of the VM. Basically, is it DMZ or not? So we have two simple options, internal or external and internal, which is effectively a DMZ selection.
We have landscape, your typical dev test stage prod. Some of these selections will help determine the VM host name, which is based on our standard. And you’ll see that that will be automatically generated by ServiceNow here, shortly. Component code, web app DB, very simple. We could add more if necessary. After I select the component code, you see that our VM host name is automatically spit out. ServiceNow will automatically select the next available rolling number. So in this case, if VMWAKG app 1N02 already exist, it’s automatically going to pull 03 for me. Cloud region, this is our target cloud. Is it on-prem or is it a hyperscaler? Currently we support Amazon, specifically the Amazon US East 1 region.
The selections you see here, the last two, NPC East and West, these are on-prem data centers. NPC East is our RTP data center in Research Triangle Park, North Carolina. NPC West is our data center in Hillsboro, Oregon. For each region, we have accompanying availability zones. In the case of on-prem, we really only have one AZ, but if I change my selection to Amazon, you’ll see that we’re supporting the US East 1A, 1B and 1C AZs. They are actually about a dozen or so. 1A, 1B and 1C are fairly arbitrary in our selection, but those are the ones that we’re committed to supporting at this time. We could certainly add more later. Of course, your operating system type. At this time, we support Linux only. We’ll be adding Windows support very soon. Your compute profile is simply the size, your VCPU and VMM. These, in the case of Amazon, do correspond to particular instance types.
Operating system selection, at this time we support CentOS 7 and Rails 7. And then, much like you would experience in Amazon, you have to select a public key. We use RSA format. So a user has to generate an SSH key, which we provide instruction on how to do. They are responsible for maintaining their key pair, especially their private key. We do not do that for them. The key that is entered here will be added to the authorized keys, when the VM is selected for a local user, what we call cloud-user. So once the VM is provisioned, the user can SSH using their private key to the VM to get access.
We can also provision storage. We support NFS or iSCSI at this time. We allow the user to select up to four volumes. As part of the VM provision, you can go in and control some parts of the volume name. The gray boxes are static. They cannot be updated. White boxes are pre-populated with information, but they can be edited, also. Mount Point, this is the mount point within the operating system. Again, the user can come in here and change this to whatever they like.
You will also notice that we have a cost here. This cost is based off two things: the compute profile selection, the size of the VM. If I change that, you’ll see that the cost changes here. This is a monthly cost, and it’s also based off the storage size. So we’re charging currently five cent per gig. So if I increase the size, you’ll see that the cost also increases. This gives a total cost, again based off compute and storage, of 133.10 per month.
Currently for on-prem this amount is strictly showback, which means that we present the price, but we’re not actually charging that to a cost center yet, but that will be implemented in the next year or so. Right now, it’s really more of a financial challenge than a technical challenge. In the case of Amazon, though, we also present a cost here and that is actually charged back directly to the requester’s cost center that they enter in the form here. That process has been in place for a long time. Internally, it’s a little more challenging with legacy process, but eventually we will do full charge back regardless of the cloud region that is selected.
Once I select everything required to provision the VM, I would click submit here, and an RITM would be created, which is emailed to the user. And within 30 minutes or less, a VM will be spit out and a confirmation sent to the user. Once the VM is fully provisioned and a success message is received by the user, they can come back into the portal and go to the Manage section. Once you click on the Manage section, you would be presented with a list of VMs that you are the owner for. As an admin, my list is quite large, but if we look at a particular VM, we can see the additional day-2 options that are available. Once I select a VM, the basic information will come up. This is stored inside the ServiceNow CI for the VM. I have my host name, IP, data center, operating system information and so on, including whether a CMDB discovery happened successfully, the owner, cost center, et cetera.
So let’s take a look at what we can do here. At the top we have some basic administrative functions, like a power on power off, reboot. We can also resize the VM to change profile size from A to B. And finally, we can also deprovision the server entirely. In the middle we have an image section. We can create or delete an image. Depending on whether the VM is VMware-based or Amazon EC2-based, what actually happens on a technical level is different. In the case of VMware, when you select or create an image, what we will do is power off the VM, create a VMware clone, and then power back up the original VM. In the case of Amazon EC2, we’re actually taking a snapshot. At the bottom we have volume ONTAP operations. In this case, you can see that the VM currently has four volumes provision. One of which is iSCSI, three of which are NFS. You can see in the case of this particular volume that it has been decommissioned. It’s still shown here, but it’s not actually mounted on the VM anymore.
In terms of storage operations, we can perform a mount or unmount. So this will actually mount or unmount the associated volume in the operating system. So if I were to select this first volume here and then select unmount, it will actually unmount the volume in the VM. It will not edit fstab, that’s not the way we designed it, so when the VM gets rebooted, the volumes would come back. In addition, you can, of course, increase the size of the volume. This is not only an increase in ONTAP of the volume size, it actually will also extend the file system inside Linux to realize the new space. You can add additional volumes if needed. And finally, you can deprovision a volume.
If we take a look at the VM that we provisioned inside the ServiceNow CMDB, we can look at the CIs that are created by the IaaS portal and the relationships between those CIs. This is the VM that we looked at earlier. You can see all the basic information. And if we scroll down to the relationship section, we can see the storage volumes that we created in the portal that are associated with the VM, and also the images that we created.
If you look right here in the middle, these are the four volumes that were created. So they have CIs associated with the storage that are custom. And when a volume has added, the CI is created and related to the VM. Ditto up here, we have a CI, a custom CI, that represents the image that we created for this particular VM. So if you create new images or remove images, then these relationships are removed accordingly. So the fact that we’re creating different types of CIs and we’re letting them here in the CMDB is very important for existing processes in terms of operational teams that have to support the portal. It’s still easy to come in to the CMDB, tried and true tool, and see the relationships and infrastructure that are out there.
Let’s move on and take a look at the high level CloudOne IaaS architecture. What we have here on the left is your end user, typically an application owner or developer coming into the ServiceNow portal to do things, to provision things. The ServiceNow portal, once you actually click on okay and submit to do something, is making an API call behind the scenes to our current CMP platform, which is Red Hat CloudForms. So Red Hat CloudForms acts as our state database.
Within CloudForms, you can add multiple providers, which you see here in this first gray box. An example of a provider would be Microsoft Azure, VMware virtual center, in which case we have several virtual centers that are represented, Red Hat Ansible Tower, and Amazon EC2. The most important one that we have is Red Hat Ansible Tower, which is sort of quarterbacking most of the automation. Most of the automation and technical underpinnings are achieved via Ansible directly. There’s a little bit that’s done with CloudForms, but the majority is Ansible. We do plan on removing the CloudForms layer. We’ve determined it’s unnecessary middleman. It’s a very complex product. It doesn’t give you much out of the box. And most of what we can achieve with CloudForms, we can do more cheaply, easier with Tower. So in the future, we will be removing the CloudForms layer.
So Tower will talk directly to multiple infrastructure providers. In our case, that means ONTAP for storage, F5 for load balancer. Eventually we will also offer object storage on NetApp StorageGRID, that’s coming. And it also talks to a Cisco ACI and Palo Alto firewalls.
So why Ansible? Most vendors out there today offer some sort of Ansible support, usually in the form of existing modules that you can utilize. So most things can be done with Ansible. In some cases, it can’t do exactly what we want to do. Or certain things may be a little less flexible with Ansible than they would be with something like a PowerShell or Python custom script. So where we can use Ansible, and because we would like to gain the IDependency and desired statefullness of a configuration management tool like Ansible, we will use it. But in other cases where it’s just not as flexible or it’s much harder to do, we will use other tools. So, right tool for the right job.
All of the code that makes up our Ansible playbooks and other, we store in Azure DevOps. We previously had an on-prem Git lab repo. And about six months ago, we made the move to Azure DevOps. Everything in DevOps is still Git, so it’s not a whole lot different, but it also brings to the table a fairly sophisticated CI/CD pipeline capabilities. So for all of our workflows that are supported, we build a pipeline inside Azure DevOps to be able to test those workflows. So, we make sure to test every single combination permutation. So for example, if we offer CentOS 7 and Rails 7, then we make sure to deploy those. We make sure to deploy one internal, one external to make sure the firewall rules and network traffic is flowing as expected. It’s much, much easier to do with CI/CD pipelines than to have to manually test all the combinations that may be out there.
Most of our DevOps pipelines are written in PowerShell. We don’t have to write it in PowerShell, but that was our preferred tool of choice. We kick off the pipelines in two ways. One way, the simple way, is just weekly we will run all the pipelines that we have that represent all the workflows that we have on a cron schedule. Right now, we’re doing that on Sunday.
The other way is through triggers. So we set up triggers for all the different playbook YAML files that we have in the Git repo. And so, for example, if you update a playbook that’s associated with VMware provisioning, then when you push the code, that change is seen and the pipeline associated with VM provision testing is kicked off. We watch the pipeline, we make sure that it runs successfully, so that we know that the code changes that were recently made did not introduce any new issues. If there are issues, then the pipeline has failed, and we see that notification. And then we can go in and look and say, “Hey, what happened? Was this error related to the recent changes that we made?” And if so, then we can easily roll back those changes.